Foodbuzz

Sunday, September 25, 2016

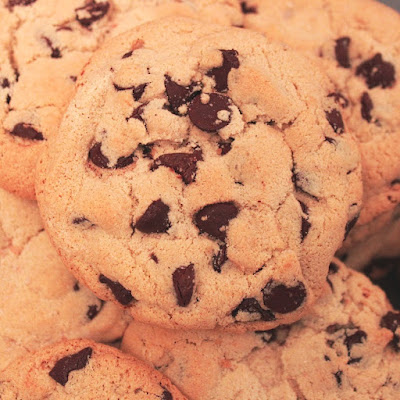
Chocolate Chip Tahini Cookies


Let's face it, every manufacturer has a vested interest in going "global" and a lot of time an money is spent on that endeavor. However, there are some global items that exploded onto the market with little effort. Most of the time it is due to an individual that visits another country and brings a unique idea or an item back home that they consider amazing. This is a small step, but the idea or item may spread like wild fire.

After the original is shared, time passes along with little tweaks. It may be developed a little more to "fit" in  according to the countries preference. This is the same when it comes to food. This post is about the "global" chocolate chip cookie. Here in the US, you will find every texture variation as well as "add in" alterations, such as walnuts or peanuts. I have enjoyed many variations through the years, but I know the variations are endless.

So, if you are taking the long (but delicious) journey of sampling all the amazing chocolate chip cookies like me, be sure not to overlook this Middle Eastern variation with tahini (sesame paste). The sesame paste adds a unique hint of nuttiness to the cookie. In addition, this recipe has one of the best contrasts of salty sweet that I can think of...dark chocolate and salt. The texture is a home run as well, since each cookie has crispy edges and a soft,chewy center. The process below makes about 12-18 big and hearty cookies. Also, be sure to plan ahead,the dough requires 12 hrs of chilling time prior to baking.

Now, let's get to the kitchen....

Chocolate Chip Tahini Cookies
adapted from Modern Israeli Cooking

Ingredients
1/2 tsp baking soda
1/2 tsp baking powder
1 cup and 2 tbs flour or matzo cake meal
1 tsp salt
1/2 cup or 4 oz butter, room temp
1/2 cup tahini 
1 egg
1 egg yolk
1 cup granulated sugar
1 tsp vanilla extract
1 3/4 cups bittersweet or semi-sweet choc

Sea salt flakes (optional for topping)

Prepare 2 baking sheets by lining with parchment paper.

Sift together flour (or matzo meal), baking soda, baking powder and salt in a medium size bowl and set aside.

In the bowl of a stand mixer, add the butter, tahini and sugar. Beat at medium speed for a total of 5 minutes, stopping from time to time to scrap down sides of bowl. Add the eggs and extract, then beat again for another 5 minutes.

Remove bowl from stand mixer and pour in sifted ingredients. Using a wooden spoon, fold the dry ingredients into the batter. Once incorporated, fold in the chocolate chips. The batter will be much softer and lighter than regular cookie dough. Cover bowl and refrigerate for a total of 12 hours.

Once the chill time is completed, preheat the oven to 325 degrees. Before you shape the dough, evaluate how large you want them. The recipe states it yields 12-18 cookies. Be aware that the size will have a direct impact on baking time. Shape the dough into balls of desired size and place on the baking sheet. Each ball should be spaced about 3 inches from the other.

Slide baking sheet in oven and bake cookies for about 13-16 minutes. The cookies will be golden on the bottom and outer edges when done. The center will still remain white, or pale. Upon removing the pan from the oven, sprinkle tops of cookies with sea salt if desired.  Let cookies cool on pan on rack for about 5 minutes, then transfer to rack to completely cool.

Tips and Notes:
1. Make sure that the tahini is mixed well prior to adding to batter.
2. The full 10 minutes of beat time is necessary to really incorporate the tahini into the dough, poor mixing results in "pockets" of tahini in your cookie batter which runs on the pan when baked.
3. My cookies took 18-20 minutes to bake.
4. These cookies will be very white in comparision to the standard chocolate chip cookie which includes brown sugar.
5. I did not use the Matzo, mainly because I only found meal instead of flour, so I cannot comment on the results of the recipe using that ingredient. 
                                     **LAST YEAR:Cranberry Black Walnut Coffeecake**
 

Sunday, September 18, 2016

Hazelnut Praline Cakes


While buttercream and fondant are covering most cakes these days, do not forget about the coated cakes, such as petit fours. However, the thought of baking cutting and dipping does seem like a major project. I imagine that is why you rarely see these type of cakes. It is not just the cutting; the dipping and decorating for that special appearance can be tedious as well.

While petit fours are pretty tasty, today's average baker is looking for something more like a snack cake. Snack cakes are small individual cakes, but they are baked in the shape you want. No cutting required. Also, another modification is to change the coating to something more tasty and less fancy.

This version of the snack cake combines hazelnut flavor, chocolate and praline. The cakes is hazelnut flavored and then it is coated in hazelnut milk chocolate with little bits of praline. In making these, 2 major factors had to be considered. The first being the structure of the cakes. Pound cake would be too dense and an airy cake would soak up the chocolate. A happy medium had to be found. Also, the cake paired with the coating had to create a good balance. Chocolate dipped brownies would be way too much sweetness.The idea of a lighter flavor cake with a strong flavored coating would make the best combination.

I have to admit, the Cacao Barry store had my business on this recipe. However, do not let that deter you from this recipe. Hazelnut ganache and toffee bits are an easy and less expensive substitute.

Now, let make some cakes! This recipe makes 1 dz cakes.

Hazelnut Praline Cakes
by flourtrader

Ingredients/Cake
1/2 cup whipping cream
1/2 tsp hazelnut extract
1 egg
2 egg yolks
3/4 cup sugar
1/2 cup butter
1/2 tsp oil
1 1/2 cups flour
1 1/2 tsp baking powder
1/4 tsp salt

Ingredients/Coating
2-3 cups hazelnut ganache (or Gianduja Plasir Lait/Milk Chocolate Hazelnut Coverture)
1/2-3/4 cup toffee bits (or Cacao Barry Praline Bits).

Prepare a muffin tin or square cake tin by buttering the interior and dusting with flour. Preheat the oven to 350 degrees. Make sure your eggs and butter have come to room temperature.

In a medium size bowl, sift together the salt, baking powder and flour. Set aside. Cut the butter into 1/4 inch chunks and place in bowl. Beat on high speed (stopping once to scrape down the sides of the bowl) for about 30 seconds until butter is smooth. Pour in sugar and beat again on high speed for about 1 minute, stopping again at intervals to scrape down the sides of the bowl. Mixture should be fluffy.

In a small bowl, whisk together the oil, egg yolks, egg and hazelnut extract. Pour into butter mixture and beat until evenly distributed throughout the batter.

Using a wooden spoon, mix 1/3 of the sifted ingredients into the batter. Then follow with 1/4 cup of whipping cream, mixing again. Follow the same steps, this time using with 1/2 of the remaining sifted ingredients. End with folding in the last of the dry ingredients.

Scoop the batter into the prepared cavities of the pans, make sure the amount of batter is about the same for all filled cavities.

Place pan in oven and bake from 18-24 minutes, or until done. Mine took about 20 minutes, but use a cake tester to determine when done. Cakes should have a golden edge.

Place pan on rack for about 10 minutes, then invert cakes onto cooling rack. Flip cakes over and let completely cool on rack.

While the cakes are cooling, if you purchased toffee bits, evaluate their size. Should you want them smaller, reduce their size by using a blender or coffee/spice grinder. With the Cacao Barry praline bits, no grinding is needed. Set aside.

Prepare the hazelnut ganache according to recipe or microwave the purchased coverture until melted (microwave in 20 second sessions, stiring after each until totally melted). Stir in toffee bits or praline pieces.

Place a sheet of waxed paper on a flat surface. Then put a rack over the paper. Dip your cooled cakes into the coating and then sit on rack to dry. If using store bought coverture, place cakes in refrigerator to have chocolate set up. Homemade ganache should set up at room temperature.

Once the coating has set up, transfer cakes to parchment or wax paper.

Tips and Notes:
1. Batter will be real thick, like cookie dough. Also and your cavities will only be about 1/2- 1/3 full.
2. You can use this recipe for mini cakes, the end result will be yield 2 dz cakes and the bake time will be around 12-15 minutes.
3. Flavor combos are limitless, so feel free to experiment. Chocolate cakes with coated with vanilla ganache with chunks of peppermint candy mixed in would be great for the holidays.
                                  **LAST YEAR:Pumpkin Chocolate Marbled Bundt Cake**
 

Sunday, September 11, 2016

Vanilla Bean Scones


It seems that the market for vanilla has really expanded. I guess when it comes to food, the new and/or improved status is guaranteed to rage on. Outside of the brown hued vanilla extract that has been on the market for years, we have: clear vanilla extract, ground vanilla bean seeds and vanilla bean paste. I am sure that at this moment someone is working on vanilla bean flour.

Anyhow, this particular recipe can be found all over the web in some variation. I figured there must be something delicious about these scones, so I decided to give them a try. I was not disappointed. They have a wonderful cake-like texture that is kept moist by the sweet vanilla coating. This recipe is definitely a keeper!

I actually ate these in the late afternoon just to taste. The next morning, I decided to have some store bought cake donuts for breakfast. After having the scones, I really thought the donuts were awful. They had some kind of a grease after-taste. Funny how these scones had such an impact on my taste buds, I had always liked the donuts before.

So be aware that these scones may make your palate pickier than it was before. Eating them is purely an act of sharpening your skills in detecting what good really tastes like! This recipe makes 24 mini or 12 regular size scones.

Vanilla Bean Scones
adapted from various website recipes

Ingredients/Scone
1 egg
1-2 vanilla bean scrapings of seeds
1/2 cup half and half
1/2 cup or 1 stick cold butter (cubed)
1/4 tsp salt
1/2 cup sugar
1 tbs baking powder
2 cups flour

Ingredients/Glaze
1 vanilla bean scraping of seeds
1/4 cup plus 2 tbs half and half
3 cups sifted powdered sugar

Prepare 2 baking sheets by lining with parchment paper and preheat the oven to 425 degrees.

Start by sifting together the salt, flour and baking powder into a medium size bowl. Then whisk in the sugar. Empty the contents into a food processor and add cubed butter and pulse until mixture resembles coarse crumbs. The other method is using a pastry blender by hand. Set aside.

In another bowl, beat the egg with a fork by hand. Then add the half and half and vanilla bean seeds, stirring together so the beans are distributed throughout the liquid. Pour into the food processor and pulse until mixture becomes like cookie dough. An alternative method is to mix together by using a wooden spoon.

Prepare a flat surface by dusting lightly with flour. Empty the dough onto the surface. With floured hands, knead the dough about 4 or 5 times. Then roll out into a rectangle 3/8-1/2 an inch thick. Once rolled out, you can cut into triangles, circles or squares. I used a square biscuit cutter.

Place the pieces on a baking sheet, spacing about 3/4 an inch apart. Bake for about 6-7 minutes if making mini size and 8-9 minutes for regular size scones. Scones should be golden brown on bottom and edges when done. Remove baking sheet from oven and let cool for a few minutes.

Take wax paper and place on flat surface and place cooling rack of the top of the paper. Then transfer scones to the cooling rack. Do not glaze until completely cool.

For the glaze, whisk together the half and half and vanilla bean seeds. Then pour into the powdered sugar and stir. Once smooth, dip each of the cooled scones into the glaze and place back on rack to set/harden.

Tips and Notes:
1. Feel free to use vanilla bean paste. Also the amount of vanilla is your preference. I have seen a recipe that incorporates vanilla bean seeds with vanilla extract.

2. Do not be afraid to experiment with other spices such as pumpkin, cinnamon or cardamon.
                               **LAST YEAR: Frosted Pineapple Cookies**

Sunday, September 4, 2016

Bali Hai Pie


While we all cannot live in tropical areas where fresh fruit is just a matter of picking it off the plant or limb, that does not mean that we have to miss out. However, the reach is a little more involved. That is mainly why I have stared at this recipe for quite some time before making it.

The recipe has mango in it, which is fairly easy to find around here. It is the passion fruit puree that took some expense and searching. Even though I made two of these pies, I still have frozen puree left over. Overall, I have no regrets. This recipe truly delivered on flavor and texture. Also, it is stunning to the eye.

If you love tropical fruits, then you will enjoy devouring an ice cold slice of this cream and fruit pie. The flaky crust is topped with coconut prior to baking. After cooling, a sweet layer of mango puree is placed in the bottom. The next layer is a silky blend of passion fruit puree, cream cheese and whipped cream. For the decoration, mango is drizzled on top following by a sprinkling of macadamia nuts. This recipe makes one 9 inch pie.

Time to make some pie....

Bali Hai Pie
adapted from State Fair Recipes

Ingredients/Crust
Pie crust dough for single layer (your recipe of choosing)
1/4 cup sweetened shredded coconut

Ingredients/Layer 1
lime zest (from 1 lime)
2 cups pureed mango chunks
1 tbs lime juice
3 tbs coconut rum
pinch of sea salt
3 tbs corn starch
1/2 cup of sugar

Ingredients/Layer 2
3 tbs butter (room temp)
8 oz cream cheese (room temp)
1/2 cup granulated sugar
3 tbs coconut rum
1 1/2 cups heavy whipping cream
1/2 cup sifted powdered sugar
1 pkg unflavored gelatin
1/2 cup passion fruit puree
1/3 cup tropical fruit concentrate
1/2 cup rough chopped macadamia nuts

Create the dough as instruction on your recipe of choice up to the point prior to baking. Then sprinkle the interior bottom of the crust with 1/4 cup of shredded coconut. After that, resume the baking instructions as provided with the chosen recipe. Let crust cool completely in pie pan before filling.

For the first layer, fill a saucepan with all the ingredients with the exception of the lime juice. Place over low heat and stir. The end result of the cooking will be a thick mixture, like the consistency of jam or pudding. This may take some time, so be patient. Once it reaches the thick stage, empty contents into a heat proof bowl and stir in the lime juice. Then set aside to cool.

The second layer starts by pouring the passion fruit puree and concentrated juice into a saucepan. Mix together and then place over low heat. Let the liquid warm up, while stirring, for about 5 minutes. Then sprinkle in the gelatin, continuing to stir. As it cooks, the gelatin will melt, disbursing into the fruit/juice blend. Remove from heat and let cool.

At this point, the first layer blend should be cooled. Take 1/4 cup of the mixture and put in a small bowl. Cover and place in refrigerator. Smooth the remaining mango filling over the top of the coconut crust, making sure the layer is even and covers the bottom interior.

Now, you are back to making the second layer of filling. First, take a metal mixing bowl and place in the refrigerator. Next, take out a stand mixer bowl and fill with the cream cheese, butter, rum and granulated sugar. Beat on medium speed until batter is smooth and all blended together. Add the gelatin mixture and beat on low until evenly disbursed into the cream cheese/sugar blend. Set aside.

Take the metal bowl out of the refrigerator and fill with the heavy whipping cream. Beat on high until stiff. Sift in the powdered sugar and beat again for about 30 seconds. Remove bowl from stand mixer and fold in the gelatin batter until mixture becomes a light ivory color. Empty mixture into pie and smooth out evenly.

Pipe the reserved mango puree in a lattice fashion over the top of the pie and then sprinkle on the macadamia nuts. Refrigerate 4 hours before serving.

Tips and Notes:
1. To have a little salty/sweet combo, use salted nuts on top.

2. To save time on the first layer, heat mixture in saucepan until sugar is dissolved in mixture. Then transfer to a heat proof bowl and microwave for about 2-3 minutes, stirring at the 1 minute interval. Keep checking for the right consistency by stirring after each one minute interval. Once it is thick, refrigerate to speed up the cooling process.

3. You are unable to taste the rum in this recipe. However, should you desire a kick of rum, the recipe suggests a stabilized whipped cream mixed with rum on top. You can pipe around the outer edge and then sprinkle a ring of nuts inside the whipped cream piping.

4. For an alcohol free pie, use coconut water in place of rum for the pie and if you desire whipped topping, use coconut extract instead of rum.

5. Not a fan of coconut? Then replace with chopped salted nuts pressed into the bottom interior of the dough prior to baking.

 5. If you do not want to serve right away, hold off on the topping of lattice piping, nuts and whipped cream until right before serving. Let the pie sit uncovered in the refrigerator until surface is solid and then cover with plastic wrap until you are ready to decorate and serve.
                              *LAST YEAR: Peach Pecan Cheesecake**