Foodbuzz

Tuesday, June 28, 2011

MacDate Cookies

Now that I have finished baking all the cookies for donation this  month, I can relax a little bit.

When I do monthly donations, my goal is to present something tasty and unique. First,  I had to take inventory of what I had on hand.  There were two items I previously had bought in bulk-macadamias and dates.  That is how I arrived at these MacDate cookies.  They are a crispy, flat cookie that has chopped dates, white chocolate and salted macadamia nuts.   These cookies give you something healthy, salty and sweet.

I did not use white chocolate chips in this recipe because most of them have palm oil as an ingredient.  Instead, I used Ghirardelli white chocolate bars. It has real cocoa butter in it and no palm oil, so it is a much better form of chocolate.

Note that this recipe yields about 6 dozen cookies.

MacDate Cookies
by flourtrader

Ingredients
1 1/4 cups chopped dates
3/4 cup chopped salted macadamia nuts
12 oz chopped white chocolate
1 cup or 2 sticks of butter (room temp)
3 eggs
1 tsp vanilla extract
3/4 cup granulated sugar
3/4 cup brown sugar
1 tsp baking soda
1 tsp salt
2 1/2 cups flour

Preheat the oven to 350 degrees and line 2 baking sheets with parchment paper.

In a large bowl, cream together the butter and both kinds of sugars using an electric mixer set at medium speed.  This should take about 30 seconds to a minute, depending on how soft your butter is.   The batter will be light and fluffy when thoroughly mixed. 

Add one egg to the batter and beat for 30 seconds.  Continue with this process until all eggs are incorporated into batter.  Then blend in the vanilla extract, beating with an electric mixer at low speed.  Set aside.

Take another bowl and sift together the flour, salt and baking soda.  Using a wooden spoon, fold this dry mixture into the sugar batter until no dry streaks remain.  Then stir in the dates, macadamias and white chocolate.

Drop batter by rounded teaspoons onto baking sheet, spacing 1 1/2 inches apart.  Bake for 8-10 minutes or until cookies turn a pale golden hue.  Remove from oven and let cool on pan for 2 minutes, then transfer to a rack to finish cooling.

Monday, June 27, 2011

Sarah Bernhardts

Today I wanted to challenge myself a little bit with something more elegant which requires more skill.  This particular recipe is basically a small almond macaron topped with chocolate that has a little bit of rum in it.

These are tasty little gems.  When you bite into these, the first flavor that comes through is the almond macaron and then it is quickly followed by the rich chocolate.   

Regarding the presentation, these did not turn out looking like the lovely picture.  In the picture, the top is a perfectly round ball with a smooth coat of chocolate.  I had difficulty achieving the smoothness and it was hard to cover the ball on top without getting the macaron coated with chocolate.  Also, practicing with making a standard macaron is something I should have done before attempting these.

I am now am toying with improving and simplifying some of the methods for making these, so it still is a work in progress. 

Anyhow, the recipe and instructions are below.

Sarah Bernhardts
courtesy of Ladies Home Journal

Ingredients
3/4 cup of heavy whipping cream
1 tsp of dark rum
1/4 tsp almond extract
2 large egg whites
1 tbs vegetable shortening
2 tbs of butter
16 oz chopped chocolate
7-8 oz almond paste (1 tube or 1 can)
1/2 cup of sugar
pinch of salt

This particular recipe makes 8 dozen cookies.  This will vary according to how large you make the macarons, but the 8 dozen is based on their size being 3/4 inch rounds.  If you have never made macarons, be aware that the batter does rise or expand when baked.

Prepare your 3 baking sheets by lining with foil and set aside.  Then preheat your oven to 350 degrees. Take out 2 pastry bags or cut off a small part of one of the corners of  2 freezer bags. Fit one bag with a 1/4 inch plain tip and the other with a 1/2 inch plain tip.

In a large bowl, beat together for 30 seconds the almond paste, almond extract, sugar, egg whites and salt.  At the initial stage, the electric mixer should be set on medium speed. After the 30 seconds, increase the speed to high and continue to beat for an additional 2 minutes.

Scoop out the batter from the bowl and fill the pastry bag that has the smaller size tip.  Then pipe the batter into 3/4 rounds on the baking sheets. Make sure that the rounds are smooth, without any tips poking up.  After one sheet is full, place it in the oven to bake for 10-12 minutes.  Once done, let rounds cool completely on pan placed over a rack.  Continue with the same process until all the batter has been formed and is baked.  After all the cookies have completely cooled, carefully peel them off of the foil and flip each one over and place on a large platter. Set platter aside.

To make the filling, take out a small saucepan and fill with heavy cream.  Place over high heat and let come to a boil.  As soon as it starts to boil, remove from heat.  Then add only 8 ounces of the chopped chocolate, rum and butter.  It will take about 40 minutes for mixture to melt and become thick enough for piping, but it will need to be stirred occasionally during this time. Once desired consistency is met, place filling inside the remaining pastry bag and pipe mounds onto the macarons.When all macarons have been filled, put them in the fridge for at least one hour to firm up.

During this time, take the other 8 ounces of chopped chocolate and place it in the top part of a double boiler.  Then add the shortening.  Fill the bottom part of the double boiler with water and place over high heat.  When the water starts to boil, turn down heat so water will only be simmering.  The top part of the boiler will now be put over the bottom and the mixture inside stirred. When the chocolate reaches a smooth consistency-turn off the heat but leave the pan in place.

Take the platter full of cooled cookies from the fridge.  Dip each cookie, mound side down, into the chocolate.  Place it back on the platter.  After completing about 6, you can stick decorations on top if desired.  Then continue this process until all cookies are dipped and decorated.  Place back in fridge until firm.  Due to the high humidity here, I placed them in the freezer for about 20 minutes.

Friday, June 24, 2011

Sweet Lemon Nut Bread

Well I have finally cleaned up the floor after the tape and bedding was done in our storage building.  To be honest, I would have rather had my fingernails pulled out.  Cleaning the floor is no big deal, but having to use a putty knife to scrape all that chalky mess off the floor is tedious.  I know that my arms will be sore tommorrow.

Anyhow, now that the worst part of the cleaning is over, I decided to treat myself with this sweet bread.  This recipe uses frozen lemonade to give it the bread that extra lemony flavor. The bread itself is studded with chopped walnuts.  In addition, the top has a glaze with fresh lemon juice.

Sweet Lemon Nut Bread
by flourtrader

Ingredients
2 tbs plus 2 tsp sour cream
1/4 cup plus 2 tbs corn or vegetable oil
1/4 cup frozen lemonade
1 cup flour
2 eggs
3/4 tsp baking powder
1/4 tsp salt
1 cup sugar
1/4 plus 2 tbs chopped walnuts
4 1/2 tsp lemon zest
1/4 cup lemon juice (for glaze)
2 tbs sugar (for glaze)

Preheat the oven to 350 degrees.  Prepare a 8X4X2 1/2 inch loaf pan by buttering all of the inside and dusting with flour.

In one bowl, add sugar, oil, eggs and lemon zest. Beat with an electric mixer about 2 minutes. Then add nuts and stir with wooden spoon. Set aside.  Take out another bowl and sift together flour, sugar, salt and baking powder.  Add 1/2 of the dry ingredients, 1 tbs and 1 tsp of sour cream and 2 tbs of the frozen lemonade.  Mix with a wooden spoon until blended then add the rest of the dry ingredients,sour cream and frozen lemonade.  Stir batter until all is evenly distributed.

Pour batter into pan and place in oven.  Baking until tester comes out clean, which should be about 50-60 minutes.  My pan is dark, so if yours is light it may take longer.

During the baking time, prepare the glaze by stirring juice and sugar together.  Glaze is ready when the sugar is dissolved.

One done, remove bread from the oven and run a knife along the edges.  Then brush glaze all over bread.  Some of the glaze will drip down between the cake and pan.  Cool bread in pan completely and then turn out on wire rack.  Cut into slices and serve.

Thursday, June 23, 2011

Paying it Forward-Blogger Community

If you do not already know, I have jumped the gun a little bit on the recent blogger awards.  Purabi advised she wanted to give me the awards and I was so excited about it,  I ran with it.  Unfortunately, she has yet to make a formal announcement of who got the awards.  However, in my excitement- I am still running with it!

I wanted to pass these awards out to some of my lovely foodie friends.  It is people like this that really makes the blogging community so fun and tasty-so below are the very deserving recipient links: 


Alex Wu-Yums and Loves
Janet-Cupcakes to Caviar
Leah-L4L
Stephanie-Bite By Bite
Erin-Dinners, Dishes and Desserts
Tiffany-Comowater
Felice-All thats Left are the Crumbs
Linda-The Purple Spoon
Monet-Anecdotes and Apples
Angie-Angies Recipes
Eftychia-Dream of Cakes
Maria-Flavors of Mumbai
Hungry Homebody
Lisa-Lisas Foods
Wendy-The Weekend Gourmet 

The awards are shown below:


Again, I am very happy to shine the spotlight on these foodies!


Wednesday, June 22, 2011

Starry Night Tarts


I am having some weird issues with uploading my photos, but I was able to get this one on here with a bit of struggle.

Anyhow, I was in the mood to make tarts or pie.  Since it is just the two of us, I decided that these little tarts would be a good idea. Less mess and less waste than a large pie or tart. Individual servings are also pretty easy to store.  

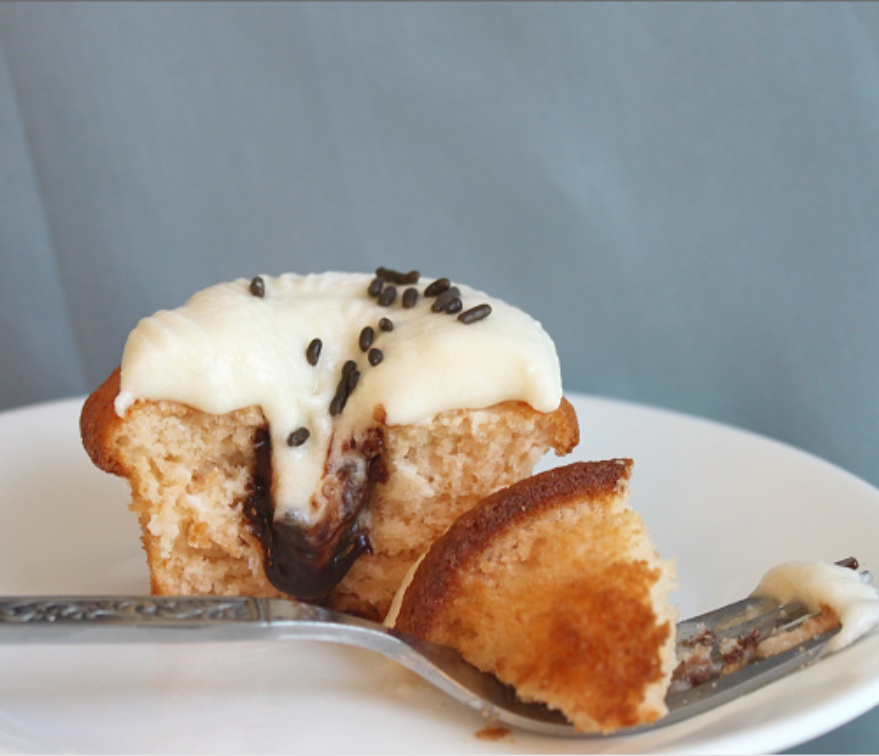
The cookie-type pastry is filled with a rich chocolate filling and topped with a tasty vanilla cream.  The chocolate part is more like a pudding than a stiff chocolate pie and the vanilla bean in the cream and pastry crusty really adds a delicious contrast.

I served a few just after dinner and they were quite tasty.  However, these are elegant enough to serve to guests at a party or special occasion. This recipe makes 6-4 1/2 inch tarts.

Starry Night Tarts
by Flourtrader

Ingredients/Crust
1/2 tsp ground vanilla beans
1 cup flour
1/3 cup confectioners sugar
1/8 tsp salt
1 tbs milk
1/2 cup or 1 stick of butter, cubed and frozen

Ingredients/Filling
2 cups milk
2 tbs water
1/4 tsp ground vanilla beans
1/2 cup sugar
2 tbs plus 1 1/2 tsp cocoa
2 tbs plus 1 1/2 tsp cornstarch
2 tsp butter

Ingredients/Cream Topping
1/2 cup plus 2 tbs heavy cream
4 1/2 tsp milk
2 tbs sugar
1 1/2 tsp powdered gelatin
1/2 cup heavy cream-whipped
2 egg yolks
1/2 tsp ground vanilla beans

To make the crust, butter the inside of your 6 tart pans and set aside.

In a medium size bowl, sift the flour, sugar, ground vanilla and salt together.  Then place in a food processor and ad the frozen butter cubes.  Pulse processor on and off about 15 times.  Then add 1 tsp milk and pulse again.  Continue to add a teaspoon of milk and pulse until dough is formed.  I had to add about 1 tablespoon of milk total.

One the correct consistency is reached, divide dough into 4 pieces.  Place each piece in between waxed paper and roll each piece until it is about 7 inches in diameter.  Put rolled dough in freezer for 10 minutes.  Remove on piece and run your hands over the top and bottom of the wax paper to make the dough a little pliable.  Remove wax paper and press dough into one tart pan.  Smooth and mold to bottom and sides evenly.  Then run a knife over top to take off excess dough.  Continue this process with 3 more tart tins.  Cover with plastic wrap, and put in freezer.

At this point you will have some excess dough.  Divide dough into 2 more pieces and follow instructions for cooling dough and then lining tarts. Cover and then place those two in the freezer also.

Then preheat your oven to 425 degrees.  Once the oven has heated up to the correct temperature, remove tarts from freezer and place on baking sheet.  Pierce inside bottom of dough with a fork to prevent any dough from bubbling up while baking.  Place in oven and bake for 5-10 minutes.  Tart shells are done when top edges are golden brown.  Remove and set on rack to cool.

To make the filling, fill a large saucepan with the milk and place over medium heat.  Bring to a simmer and then remove from heat.

Take the top pan of a double boiler and fill with egg yolks, sugar, cocoa, cornstarch.  Whisk ingredients together.  There will still be dry areas, so add 1 tablespoon of water and stir.  The final consistency should be a thick paste, so continue with the water until it reaches the paste stage.

Pull out the bottom part of a double boiler and fill with water.  Place over high heat and then turn down until water is only simmering.  At that moment, slowly pour the milk mixture into the cocoa paste, whisking batter as you pour.

The batter now needs to be cooked, so place the top pan of the double boiler over the bottom. the mixture will need to cook for about 45 minutes.  During this time, you will need to stir frequently.  The mixture will eventually turn into a pudding.  Remove the pan and still in the butter and vanilla beans.

Place a sieve or mesh strainer over a shallow heat proof bowl.  Pour the chocolate filling into the strainer.  Then cover all surface of the filling with plastic wrap and place in the fridge.  Filling will need to chill for at least 1 hour to reach a cold temperature.

After chilling time is completed, invert tart pans to remove crusts.  Turn crusts upright and spoon in chilled filling until full and smooth top. Then place tarts back on baking sheet and chill in fridge for at least 4 hours.  I left them in overnight.

After tarts have completely chilled, you will need to make the cream.  In a saucepan, fill with cream and sprinkle with ground vanilla beans.  Bring to a boil and then remove from heat and let sit to cool for about 30 minutes. 

In a small bowl, add milk and sprinkle with gelatin powder. Set aside.

Take another small bowl and whisk together the egg yolks and sugar.  Then get out a pan and fill with water and place over medium high heat.  Once it boils, turn it down to where the water is only simmering.  Then place the pan of the cream mixture over the simmering water.  Slowly pour in the batch of beaten sugar and eggs, whisking constantly.  Then cook the mixture, stirring with a spoon until it becomes thick.  Once it is thick enough to coat the back of a spoon, remove from heat.

Pour the milk gelatin mixture into the cream batter.  Stir to blend.  Then strain the mixture into a shallow heat proof bowl.  Fill your sink with a few inches of cold water, just enough to cover the sides of the bowl but not submerge it.  Place bowl of cream in sink of cold water and stir until it reaches room temperature.  Then fold in the whipped cream.

Put bowl in fridge for 15-20 minutes for cream to firm up.  Once it is firm, you can pipe the stars on top of the tart.  Take a freezer bag and cut off the corner and place star tip inside.  Then spoon in cream and decorate as desired.  Place back in fridge for about two hours and then serve cold.  Enjoy.
 

Monday, June 20, 2011

Shrimp Po'Boys with Mustard Slaw

This post is not so much about the shrimp recipe as it is about the ice cold topping.  Since I had seen so many recipes using mustard powder in the fry batter, I wanted to incorporate the mustard into the topping.

Before I get to the recipes, I wanted to show you some wonderful blogger awards that I received recently:

These were given to me by this wonderful blogger, Purabi at Cosmopolitan Currymania. Thank you Purabi! If you do not know her yet, you are missing out. The thing that is so amazing about her is that she posts new recipes almost every day.  Now these are not just recipes for something easy like honey butter, most of them represent very extravagant and flavorful dishes.  Knowing how much time and dedication it takes in the kitchen to pull this off on such a regular basis tells me that she is very passionate about cooking.  It is that passion that really shines through in all her delicious blog posts.  So, if you have some time, you might want to pop on over to her site here.

I will be passing these lovely awards on to some of my other favorite foodies in the next few posts- so stay tuned!  Now on to the recipes...

Shrimp Po'Boys

Ingredients/ Shrimp

1/2 tsp salt
1/2 tsp pepper
2 cups flour
3 eggs
3 cups panko bread crumbs
24 medium size shrimp (peeled, deveined and tails removed)
4 bratwurst rolls
3 tbs butter (for toasting rolls)
peanut oil for frying

Ingredients/ Slaw topping

2 tsp A1 steak sauce
1 tsp worcestershire sauce
4 drops of hot sauce
2 tsp dry mustard
1/2 cup mayo
2 cups or more of shredded cabbage
 
To prepare shrimp, fill the fryer with oil and preheat to 350 degrees. Also preheat oven to 175 degrees to keep food warm while you continue to cook.

Fill one gallon size bag with flour, salt and pepper.  Close and shake to mix together.  Fill another bag with the Panko crumbs.  Then fill a pasta bowl with the eggs and beat until frothy.

Once your oil is up to temperature, place about 12 shrimp in the bag of flour and shake to coat.  Remove each piece and coat in the egg batter and then drop each separately into the bag of panko.  Shake to coat all pieces.  Take out each piece of shrimp and place it in the fry baskets hanging on the edge of the fryer.  Submerge baskets, letting shrimp fry in oil for about 2 minutes.

Remove fried shrimp and place on platter.  Put platter in oven to warm while you repeat the same process of frying for the remaining shrimp.

After all shrimp is cooked and in the oven, you can start making the slaw topping.  Take out a medium size bowl and mix the mayo with the mustard until completely blended.  Then stir in the remaining liquids.  Lastly, mix in the shredded cabbage.  Cover bowl and place in fridge.

Place a small saucepan over medium heat and melt butter.  Then grill the brat rolls, the open faced side, in the butter.  Remove when the heated side of the bread turns a toasty golden brown.

Take out the chilled topping from the fridge.  Put 6 shrimp inside each rolls and top with mustard slaw and serve. Enjoy!

Saturday, June 18, 2011

Maple Pumpkin Bars

This is more like a wintertime treat, in fact I am really surprised that I found any pumpkin at the grocery store.  For these bars, I utilized maple candies. They are actually called maple nut goodies and have been a favorite candy of mine for years.

The bars came out thick and moist with a crunchy nut layer running through them.  The maple layer is a combination of butter, sugar and chopped candies.

Maple Pumpkin Bars
by flourtrader

Ingredients/filling
1/4 cup sugar
1/4 cup light corn syrup
1 beaten egg (room temp)
1 tbs maple syrup
2 tbs butter
1/4 tsp vanilla extract
1 cup chopped maple candies

Ingredients/Bars
1 egg
1/2 tsp vanilla extract
3/4 cup pure pumpkin (not pie filling)
1 1/2 cup flour
1 tsp baking powder
1/8 tsp salt
1 cup light brown sugar
1 stick or 1/2 cup butter

To make the filling, take out a small saucepan and place it over medium heat.  Add the butter and heat until melted.  Using a wooden spoon, stir in corn syrup and sugar.  Cook mixture, stirring constantly until you no longer have a gritty consistency at the bottom of the pan and sugar has completely dissolved.  Remove from heat and place pan in fridge to cool for 5 minutes.

While that is cooling, whisk together egg, vanilla, maple sugar and salt in a large bowl.  Once the timer goes off, check the temperature of the sugar/butter mixture, it should be lukewarm to the touch. Stir the mixture and then slowly pour it into the egg batter.  Scrape saucepan with a spatula to remove all the syrup and place into the egg batter.  Then beat batter with a wooden spoon and add chopped candies. Set aside to make cake batter.

Preheat the oven to 350 degrees then line the bottom of an 8 inch square pan with parchment paper, bringing paper up 2 sides of the pan with an overhang.

Again, take a small saucepan and melt the butter over medium heat.  Remove.  Using a wooden spoon, stir in the brown sugar until all is dampened with the butter.  Beat in the egg and vanilla. Lastly, stir in the pumpkin and set aside.

In another bowl, sift together the salt, flour and baking powder.  Then fold flour mixture into wet batter.  Place half of the batter in the pan and smooth the top.

Go back to the pan of filling and mix for one last time.  Pour over the batter in the pan.  Complete the layer process by spooning the rest of the batter over the filling.  Using a dampened knife, smooth the top layer evenly over the filling as best you can.  Some of the filling will show through on the sides, but that is okay.

Place in oven and bake for 30-45 minutes or until edges are brown and center has solidified.  It is not done if center still moves when pan moves.  Also, the top will develop cracks.  Remove from oven and let sit in pan for 15 minutes to cool.  Then scrape between cake and edge of pan on sides that do not have parchment paper on them.  Using parchment overhang, pull cake out of pan and place on a rack to finish cooling.

One cool, cut and serve. You can also add vanilla ice cream or a scoop of whipped cream on top.

Tip: should you want a shortcut, you can always just stir the candy pieces into the batter and bake.

Wednesday, June 15, 2011

Aztec Treasure Cookies

Do not mistake these as ordinary chocolate chip cookies, because they are far from it. In fact there are not any chocolate chips in them. These are actually cookies made with Kahlua and chocolate covered pecans.

You always hear that the alcohol burns off when baking.  That may be true, but these cookies still have the flavor of Kahlua.  Call it the leftover "essence" if you want to.   I just baked them so I still have to see if time makes them stronger.  After all, us adults need some treats once in a while!  Also, since they have alcohol-it wards off the kids (little crumb snatchers).

So take some time for yourself and make these cookies.  One taste will make you realize that being an adult really does have its perks!

Aztec Treasure Cookies
by flourtrader

Ingredients
1 1/2 cups chopped chocolate covered pecans
1/4 cup of Kahlua or coffee liqueur
1 egg
1/2 tsp espresso powder
1/2 cup of shortening
1 cup brown sugar
1 3/4 cup flour
1/2 tsp soda
1/2 tsp salt

Preheat the oven to 350 degrees and line 2 baking sheets with parchment paper.

Take out a medium size bowl and sift together flour, soda, salt and espresso powder.  Set aside.

Then in a separate bowl, using an electric mixer,  beat together shortening, eggs and brown sugar until smooth.  This should take about 30-45 seconds on medium speed.  Put mixer away.

Add the coffee liqueur and mix with a wooden spoon.  Once blended, pour in the sifted ingredients and stir with the spoon until no flour streaks remain.  Lastly, put the chocolate pecan pieces into the cookie dough and distribute evenly by using the spoon.

Drop rounded teaspoons of cookie dough onto baking sheet, about 1 1/2 to 2 inches apart.  Bake in oven for 8-10 minutes or until almost no imprint remains when touched and edges have browned.  Remove cookies and let cool on pan for 2 minutes. Then transfer to a rack to finish cooling.

This recipe makes about 3 dozen.  Enjoy!

Monday, June 13, 2011

Alpine Easter Bread

This is an egg bread recipe and, like most, has a history of myths and metaphors behind it. Egg bread is recognized as a symbol of rebirth, which is usually why the loaves are most popular in the spring.  They are also known to have certain healing powers.

This particular bread gives off  a wonderful aroma while baking. If you have a full house, everyone will want a piece when it comes out of the oven.  The loaf has a light texture and is flavored with lemon and vanilla.  Since the bread has a subtle sweetness like Hawaiian bread, it is good for breakfast as well as dinner. I am tempted to try french toast with it-if there is any to spare for tomorrow am. This makes one 10 inch round loaf, so you will need a spring form pan or cake pan of that size.

Alpine Easter Bread
courtesy of Baking Bread:Old and New Traditions Cookbook

Ingredients
1/2 tsp lemon extract
1 1/2 tsp vanilla extract
1/2 cup warm water (105-115 degrees)
3 eggs (room temp)
1/2 cup of milk
1/2 cup or 1 stick of butter
pinch of sugar
4-4 1/2 cups flour
2/3 cup sugar
1 1/2 tsp salt
2 tsp lemon zest
1 tbs plus 1 1/2 tsp dry yeast

Place a small saucepan over medium heat and add milk and butter.  Heat until all the butter is melted and set aside to cool for about 20 minutes.

Put warm water in a small bowl and sprinkle yeast and pinch of sugar over the water.  Stir and let stand for about 10 minutes to get foamy.

Get out a stand mixer and put in the paddle attachment.  Place salt, lemon zest, sugar and 1 1/2 cups of flour in mixer bowl.  Mix on low for about 30 seconds.  Add the melted butter and milk combination to the batter.  Then pour in extracts.  Lastly, put all eggs and yeast mixture into batter. Beat all ingredients together on medium speed for about 2 minutes.

Switch the speed to low and add the flour in 1/2 cup increments, mixing after each addition.  Once the last 1/2 cup has been added, take out the paddle attachment and put in dough hook.  Knead the dough for about 3 minutes-adding about 1 tablespoon of flour after each minute passes. After this, the dough will still have a sticky texture and will not be dry, so do not be tempted to add any more flour.

Grease another large bowl and place dough inside.  Then cover with plastic wrap and allow to rise in a warm place for 2 hours. 

During the rising time, grease the inside of your pan.  After the dough has risen, spoon one large lump into pan, letting the dough spread evenly.  Then cover and let rise for another hour.

After 45 minutes, preheat your oven to 350 degrees.  Once 2nd rising time is complete, uncover and place pan in the oven to bake for about 45-60 minutes. Bread is done when cake tester comes out clean and top is toasted.

Let bread cool in pan for 15 minutes, then release and place bread upright on rack to cool.

Thursday, June 9, 2011

Amaretto Chocolate Chip Bundt Cake

I was in the mood for cake, but with out all that heavy icing.  Bundt cakes are some of the best cakes for stand alone flavor and this one is no different.

The cake has some amaretto in it and a light sprinkling of mini chocolate chips.  In addition, almond flour and extract are included to really bring out the nut flavor.  I used bread crumbs to line the pan so the cake came out toasty on the outside.  It also made it very easy to release from the pan, which always guarantees a lovely presentation.

If you are a fan of almond and chocolate, then this is something you should try.  My friends and family really like this one.

Amaretto Chocolate Chip Bundt Cake
by flourtrader

Ingredients
1/2 cup of almond flour
2 1/2 cups regular flour
1/2 tsp baking powder
1/2 tsp baking soda
2 cups sugar
3 eggs (room temp)
1 cup buttermilk
1/4 cup amaretto
1/2 tsp almond extract
1 cup mini choc chips (mixed with 1/4 cup flour)
1 cup or 2 sticks butter
2-3 tbs melted butter (for greasing pan)
1/4 cup breadcrumbs (for dusting pan)

Preheat oven to 350 degrees.  To prepare 12 cup bundt or tube pan, take a paper towel and dip in melted butter.  Then rub butter on the inside of the pan, covering all areas.  Lastly, dust the inside with the breadcrumbs.

In a medium size bowl, sift together baking soda, baking powder and the two kinds of flour.  Set aside.

Put 1 cup of butter in a large mixer bowl and beat with an electric mixer until smooth and glossy.  This should take about 1 minute and butter should cling to the sides of the bowl.  Add the sugar in 1/2 cup increments and continue to beat.  Beat for about 4-5 minutes total, occasionally scraping down the sides of the bowl.

Beat one egg in a small bowl with a fork and add it to the butter mixture.  Beat with an electric mixer until smooth.  Continue with this process with each of the remaining eggs.  Should your batter look curdled or watery, you will have to continue to beat until it gets back to a smooth consistency.

Add the amaretto and the almond extract to the batter.  Then stir with a wooden spoon until blended. Take 1/3 of the sifted ingredients and fold into the batter.  Pour in half of the buttermilk and stir.  Continue by stirring in the sifted ingredients and buttermilk in stages, ending with the dry ingredients.  Lastly, fold in the chocolate chip/flour mixture until evenly distributed.

Spoon batter into pan and smooth the top with a spatula.  Bake for 55-65 minutes or until a tester comes out clean.  Remove pan and place on rack to cool for about 20 minutes.  Then run a butter knife around the edges and invert cake onto a wire rack to cool.  Let cool completely.

Cake can be sliced and served after cooling.  To make ahead of time, cake can be frozen for up to one month and then thawed at room temperature for 3 hours prior to serving.

Wednesday, June 8, 2011

Italian Dippers

Getting home late on Monday prompted me to want to make appetizers instead of having a heavy meal.  It had been some time since we had any Italian food and I still had some spicy sausage from Central Market.

I had the idea to make something like toasted ravioli only the filling would be different, it would be more hearty.  After some trial and error, I came up with these Italian dippers.

These are actually deep fried shell pasta filled with sausage, onions, mozzarella and spices.  The shells overlap one another to keep the filling from coming out.  Each piece is quite a bit more than the regular ravioli and it takes only a few to satisfy.

Another neat thing is that the variations of fillings you can try for these are endless.  This recipe makes about 12-15 toasted shells.

Italian Dippers
by flourtrader

Ingredients
30 pasta shells
1/2 sprig of fresh rosemary leaves, chopped
2 basil leaves, chopped
1/2 lb of spicy Italian sausage
9 slices of  pepperoni (about 1-1 1/2 inch diameter size) quartered
1/4 cup chopped onions
1 cup grated mozzarella
Italian bread crumbs
2 egg whites
oil for frying
1 jar of marinara or spaghetti sauce for dipping

Fill a saucepan with 1 tbs of oil and place over medium heat.  Then add the onions and saute until translucent. Add the sausage, breaking up meat into small pieces.  Stir and cook sausage for about 3-5 minutes, until all areas are brown..  Once the meat is cooked, add the pepperoni pieces and cook until pieces release their oil and become glossy. Stir in rosemary and basil and let cook for another minute.  Remove from heat and place sausage mixture in a heat proof bowl to cool.

Once mixture has cooled, mix in the grated cheese until evenly distributed.  Set aside.

Then cook your shell pasta according to manufacturers instructions.  After cooking and draining, rinse shells with cold water until pasta pieces are cool to the touch.

Fill one pasta shell with about 2-3 tablespoons of meat mixture.  Then take another shell and overlap the other shell, covering the opening of filling.  Continue this process until all the filling is used up., placing formed shells on a platter.

Place 1 cup of bread crumbs on a plate and spread out evenly.  In a medium size bowl, lightly beat the egg whites.  Then preheat your deep fryer to 350 degrees.

Dip each filled shell into egg whites and allow excess to drip off.  Then roll in crumbs and set aside.
Repeat process until all formed shells are coated.  Place 3 shells at a time in the fryer basket (we have a fryer with 2 rectangular baskets) and cook in hot oil for about 3 minutes.  Remove and place on paper towels to drain.

Serve toasted shells with a bowl of marinara for dipping. Enjoy!

Sunday, June 5, 2011

S'more Ice Cream

I have actually been thinking of making this for quite some time.  I had used marshmallow creme in a recipe several months ago and then found out that there is actually "toasted" marshmallow creme out on the market.  At that time, I decided that if I used any more marshmallow creme-it would have to be the toasted version.  I was able to find the toasted version at the local grocery store.

The ice cream base has the marshmallow creme in it and the add ins are chunks of frozen graham cracker crumbs coated with milk chocolate.  I decided to use graham crumbs instead of graham crackers for fear that those pieces would somehow get soggy.

For those that feel that this ice cream is too over indulgent, you can leave out the add ins.  The toasted marshmallow ice cream is tasty enough to stand alone. 

My husband (who was not interested in the last ice cream I made) tasted a little of this and then got a big scoop of it.  I guess it met with his approval! This recipe makes about 4 or 5 servings, now here it is.....

S'more Ice Cream
by flourtrader


Ingredients/ Crust
5 tbs melted butter
1 1/4 cup of graham cracker crumbs
1/4 cup of sugar
5 Hershey milk chocolate bars

Ingredients/Ice Cream
1 1/2 tsp vanilla extract
1-7oz container of  toasted marshmallow creme
5 egg yolks
1 cup heavy cream
2 cups skim milk
1/2 cup sugar

To make the crust, preheat the oven to 350 degrees.  Mix butter, graham cracker crumbs and sugar
in a medium size bowl until all is blended evenly.  Then take out a 9 inch square pan and press mixture evenly on the bottom and up the sides.  Don't worry too much about the look of the sides, the crumbs are only going there for baking purposes-not for the final product.  Place pan in oven and bake for six to eight minutes.

Once crust is done, remove pan from oven.  With a knife, knock down the crumb sides to the the crumb bottom and smooth it the best you can.  Then unwrap the Hershey bars and place on the crumb bottom, in one layer. You will need to break up some to make them fit and completely cover the bottom.  There will be some chocolate left over, set it aside for now.

Place the pan back in the oven for two minutes.  Then take it out and smooth the chocolate with a knife, making sure all crumbs are covered.  If the thicker areas of graham crumbs give you problems, just use the extra chocolate on those areas.  Place the pan back in the oven for another couple of minutes, remove and smooth again.  Then place pan in freezer and turn off oven.

After about 15-20 minutes, the crust and chocolate should be frozen.  Remove and chop with an ice pick or the point of a knife.  Pour the pieces in a freezer bag and place back in freezer.

To make the ice cream, place the marshmallow creme in a food processor and set aside.

Then take out a saucepan and place over medium heat.  Pour the milk into the pan and add the vanilla extract.  Stir the mixture constantly and let come to a light simmer.  It should reach a point where it is steaming, but not boiling.  Remove from heat and set aside.

Place egg yolks and sugar in a bowl and whisk together until it becomes a light yellow color. This should take about 3-5 minutes.  Continue to stir and slowly add 1/4 cup of the milk solution.  Then add another 1/4 cup of the milk solution and stir again.

Put the saucepan back on the stove and then add the yolk mixture. Stir  gently and constantly.  As you are doing this, the ice cream base should go back to the steaming-not boiling point.  It will also thicken.  This process will take about 3-5 minutes. Once it reaches the texture of heavy cream, remove from heat and vigorously stir for about 3 minutes.

Then pour the ice cream base into the food processor with the marshmallow creme.  Run the processor for about 2 minutes.  Then add the heavy cream and run the processor for another 30 seconds.

Pour mixture in a bowl and refrigerate for at least 8 hours  or leave it to chill overnight.

Once completely chilled, take out ice cream base from fridge and mix with a wooden spoon.  Then pour it into the ice cream maker and follow the manufacturers instructions.  On the last 3 minutes, add the chocolate coated graham crumbs and complete the churning process.

Then pour ice cream into a container and freeze for at least 2 hours.  This is for the flavors to meld.  Any additional time can be added, depending on your preferred consistency.

Then sit back and enjoy one of the great things about summer-ice cream!

Friday, June 3, 2011

Jamaican Coin Cookies

Today, I decided to make cookies. I seem to have a lot of recipes for very large cookies and cookies that included chocolate.  There is nothing wrong with that-but I wanted something smaller and not as rich. Through trial and error, I came up with these little tropical cookies. They are about the size of a coin, hence the name.

The ingredients combine to make them triple textured.  The cookie part is crumbly and the pineapple provides a chewiness. Lastly you have the crunch from the toffee bits.  I also added rum to the mix.  Right now, (just baked them) I cannot taste the rum.  The flavor may show up after these have sat for a day or two.  In the recipe below, vanilla extract is also listed as an option.

Regarding the dried pineapple, the best method is to chop by hand.  The end result may be a little sticky, but I tried using flour and a food processor.  Even though the flour was sifted off the pineapple after processing, it ended up too fine,  It resulted in tasteless crumbs!  Stickiness was better.

The size of the cookie varies when you round out the dough, 1/2 rounds or 1 inch rounds.  The recipe makes 60 small or 30 of the 1 inch cookies.

Jamaican Coin Cookies
by flourtrader

Ingredients
1/2 cup of toffee bits
1/2 cup of chopped dried pineapple
3 tbs of rum or 1 1/2 tsp of vanilla extract
3/;4 cups of butter
2 cups of flour
1/2 cup powdered sugar

Prepare two cookie sheets by lining with parchment paper.  Then preheat the oven to 350 degrees.

In a medium size bowl, beat butter and sugar together until smooth and creamy. Then add the rum or the extract (whichever you prefer) and mix with a wooden spoon.  Stir in the flour..  Then add the pineapple, separating it and sprinkling the best you can.  Lastly, add the toffee bits. Mix until the bits and pineapple pieces are evenly distributed into the batter.

Take dough and form into balls, either 1/2 to 1 inch in diameter, and place on cookie sheet one inch apart.  Place one sheet in oven and bake.  The 1/2 inch balls will take 12-15 minutes.  For the 1 inch balls add 5 minutes bake time. When baking cookies with candy (other than chocolate) you want to be careful, over baking results in a rock hard cookie. Repeat with remaining cookie dough until all is formed and baked.

Remove cookies from baking sheet and place on rack to cool.

Wednesday, June 1, 2011

Passion Fruit Chocolate Filled Cupcakes

I noticed that I had a baked goods donation coming up, so I went to the market.  When I saw that they had passion fruit, I couldn't pass it up.  I still had unused bottles of the nectar in my fridge that I bought previously.

I decided to make cupcakes with the nectar and icing with the pureed fruit.  In addition, I wanted them to have a dark chocolate filling. I also got some chocolate sprinkles to top off the icing.  It looks I got a little impatient with the above photo because I could not get a clean cut.  The frosting went down over the tunnel of chocolate.

The cake part turned out light and airy due to the egg whites.  I was glad because it was a good palette, allowing for the tartness of the icing and the rich chocolate filling to really be the leading acts of flavor.

The recipe below makes about 20 cupcakes.

Passion Fruit Cupcakes
by flourtrader

Ingredients/for cake
6 egg whites
3/4 cup passion fruit nectar
red & yellow food coloring (orange colored cake is optional)
2 cups flour
1/4 tsp salt
2 tsp baking powder
8 tbs or 1 stick of butter (room temp)
1 1/2 cups sugar
1/8 tsp cream of tartar

Ingredients/Dark Chocolate Filling

2 tsp of butter
1/2 cup whipping cream
1/2 lb or 8 oz semisweet chocolate chips

Ingredients/Passion Fruit icing
1 tbs butter
1 tsp passion fruit nectar
1 passion fruit (mine was the size of an apricot)
1 cup of sifted powdered sugar

To make the cake, take out 2 muffin tins and grease the top edge of the holders and then line with cupcake papers.  Preheat the oven to 350 degrees.

Place butter and sugar in a large mixing bowl and beat with electric mixer until the batter becomes light and fluffy.  It should take about 3 minutes on medium speed.  Set aside.

In another bowl, sift flour, salt and baking power together.  Sift one more time. Then pour half of this dry mixture into the sugar batter.  Fold the flour into the batter by using a spatula or wooden spoon until no dry streaks remain. Stir in the fruit nectar until well blended. Pour the remaining dry flour mixture into the batter and mix thoroughly.  If using food coloring, stir in a few drops at a time, checking the color.  Continue adding drops and stirring until desired color is met.  Set aside..

Pull out another bowl and fill with egg whites and cream of tartar.  Using clean mixer beaters, whip eggs whites on high until stiff peaks are formed but mixture is still shiny and not dry.  Fold the egg whites into the batter with a spatula until evenly blended.

Fill the cavities of the prepared pan and bake for 20-25 minutes or until tester comes out clean.  Cool in pan for 2 minutes.  Then remove cupcakes and place on rack to finish cooling.

After the cupcakes have cooled, use a knife or cupcake corer to take out a small cylinder or cone of cake from the center of the cupcake.  Now you are prepared for the next step of the filling.

To make the filling, place a saucepan over medium high heat.  Put the cream and the butter in the saucepan and let cook until it comes to a rolling boil.  Then add the chocolate and stir for 1 minute and remove from heat.  Continue to stir an additional 5 minutes.  This will result in a smooth and shiny filling.  Set aside and let cool to room temperature.

After the filling has cooled, get out a gallon freezer bag and cut off a small piece of the corner.  Using a large spoon, put filling into bag. Then pipe chocolate into cupcake cavities until chocolate reaches the top.  Let filled cupcakes sit for at least an hour before frosting.

To prepare the filling, cut passion fruit in half and pull out interior fruit and place in a blender.  Pulse a few times and then put into a mesh strainer.  Push pulp through strainer into a small bowl, leaving the seeds behind.

Add sugar, butter and pulp to a small bowl and beat with an electric mixer.  Add the nectar and beat again.  At this point you can add more nectar or add more sugar-depending on what consistency you want.  However, you do not want a grainy texture nor do you want the sugar to overpower the flavor of the passion fruit.  My icing was, as you can see by the picture, medium texture.  It was not thick and stiff nor was it like a glaze.

Decorate and frost cupcakes as desired.  I added sprinkles on top of the frosting.